Never checked to see if there was a new BIOS available for my netbook since I bought it. A quick check in the BIOS revealed that the current version is 0804. [2011-01-23_13-22-52_42.jpg 2011-01-23_13-28-17_156.jpg 2011-01-23_13-48-33_687.jpg 2011-01-23_13-49-01_148.jpg 2011-01-23_13-49-14_588.jpg 2011-01-23_14-16-16_874.jpg 2011-01-23_15-01-03_124.jpg 2011-01-23_15-01-11_252.jpg 2011-01-23_15-01-34_812.jpg 2011-01-23_15-02-02_554.jpg 2011-01-23_15-02-31_421.jpg 2011-01-23_15-07-43_881.jpg install.mp4]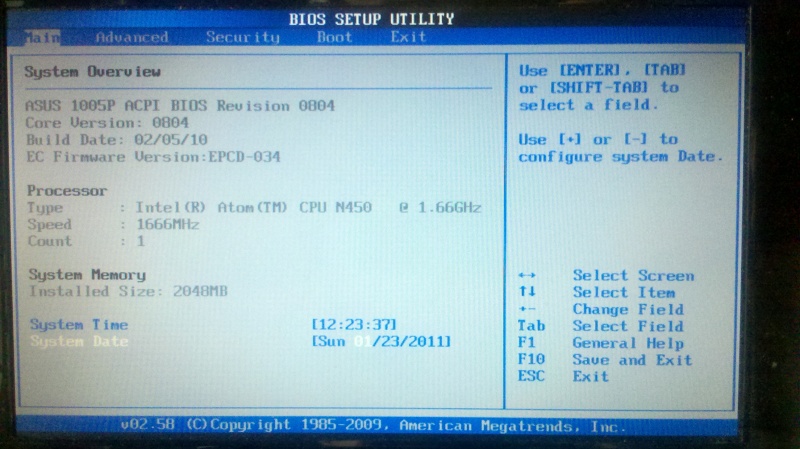 A check on the support site for Asus show there are quite a few revisions available: 0901
1003
1103
1202So, time for an upgrade :). I put wat I did on this page. Could be there are mistakes, so take care when upgrading your own BIOS. You can easily brick your system doing so. Downloading the required files from the Asus website indicated a DOS based executable for upgrading the BIOS. So I searched for a bit and found an old 64MB USB memory stick to turn into a bootable device with DOS on it. [2011-01-23_13-22-52_42.jpg 2011-01-23_13-28-17_156.jpg 2011-01-23_13-48-33_687.jpg 2011-01-23_13-49-01_148.jpg 2011-01-23_13-49-14_588.jpg 2011-01-23_14-16-16_874.jpg 2011-01-23_15-01-03_124.jpg 2011-01-23_15-01-11_252.jpg 2011-01-23_15-01-34_812.jpg 2011-01-23_15-02-02_554.jpg 2011-01-23_15-02-31_421.jpg 2011-01-23_15-07-43_881.jpg install.mp4]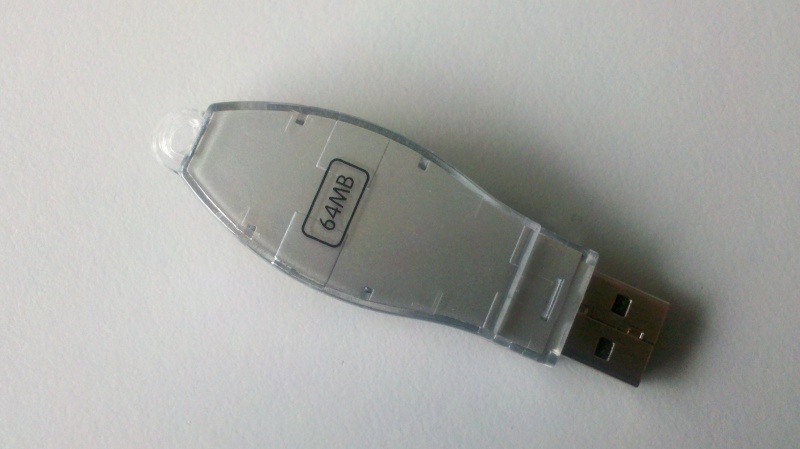 Then I downloaded FreeDOS base CD from their website. I used the small ISO, that is enough to make a bootable USB stick. I reinitialised the USB stick, started by putting a new partition table in place. In the example below the stick was available as sdf. Usually it is easiest to check the output from dmesg to see the device assigned. I did the following to put the partition table in place: # fdisk /dev/sdfAfter that I put a master boot record (MBR). If you don’t have the install-mbr command, install the mbr package. install-mbr /dev/sdfNow that the stick is basically prepped, it is time to install FreeDOS on it. I used the assistance of qemu to do this, it is probably the easiest and quickest way. Qemu was started as root with the USB stick as first harddrive and the downloaded FreeDOS base image as cdrom drive. Qemu is booting from the cdrom. qemu -hda /dev/sdf -cdrom ~mark/download/fdbasecd.iso -boot dThe installation process is quite straightforward, but I included a screen capture for good measure. After the installation is completed, quit qemu. Now we have to do some postprocessing. First, mount the USB stick and copy the Asus utilities and ROM on it. mount /dev/sdf1 /mnt
cd /mnt
cp /tmp/1005P-ASUS-1202.ROM bios.rom
cp /tmp/BUPDATER-V1_12/BUPDATER.EXE .Then we need to make some changes to the bootprocess of FreeDOS so it will not load all kinds of software that might interfere with the flashing process. First, edit the FDCONFIG.SYS file and let only the following lines remain: !COUNTRY=001,437,C:FDOSBINCOUNTRY.SYS
!SET lang=EN
!LASTDRIVE=Z
!BUFFERS=20
!FILES=40
!DOS=HIGH,UMB
!DOSDATA=UMB
!set dircmd=/ogn /4
!MENUCOLOR=7,0
DOS=HIGH,UMB
SHELLHIGH=C:FDOSbincommand.com C:FDOSbin /E:1024 /P=C:autoexec.batSecond, edit the AUTOEXEC.BAT and change is so only the following lines remain: @echo off
SET dosdir=C:FDOS
set PATH=%dosdir%bin
set NLSPATH=%dosdir%NLS
set HELPPATH=%dosdir%HELP
set temp=%dosdir%temp
set tmp=%dosdir%temp
SET BLASTER=A220 I5 D1 H5 P330
REM ShsuCDhd /QQ /F:C:FDBOOTCD.ISO
SET autofile=C:autoexec.bat
alias reboot=fdapm warmboot
alias halt=fdapm poweroff
SET CFGFILE=C:fdconfig.sys
echo type HELP to get support on commands and navigation
echo.
echo Welcome to FreeDOS
echo.That should be it, unmount the USB stick so you can boot the Eee PC from it. umount /mntIt might be best to disable bootbooster in the BIOS if you are using that. [2011-01-23_13-22-52_42.jpg 2011-01-23_13-28-17_156.jpg 2011-01-23_13-48-33_687.jpg 2011-01-23_13-49-01_148.jpg 2011-01-23_13-49-14_588.jpg 2011-01-23_14-16-16_874.jpg 2011-01-23_15-01-03_124.jpg 2011-01-23_15-01-11_252.jpg 2011-01-23_15-01-34_812.jpg 2011-01-23_15-02-02_554.jpg 2011-01-23_15-02-31_421.jpg 2011-01-23_15-07-43_881.jpg install.mp4]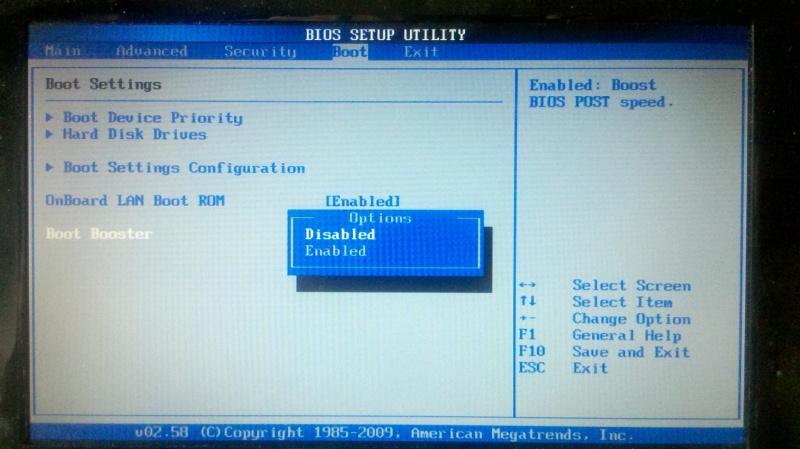 Insert the USB stick into the Eee PC. Press ESC to get into the selection screen for the boot device. [2011-01-23_13-22-52_42.jpg 2011-01-23_13-28-17_156.jpg 2011-01-23_13-48-33_687.jpg 2011-01-23_13-49-01_148.jpg 2011-01-23_13-49-14_588.jpg 2011-01-23_14-16-16_874.jpg 2011-01-23_15-01-03_124.jpg 2011-01-23_15-01-11_252.jpg 2011-01-23_15-01-34_812.jpg 2011-01-23_15-02-02_554.jpg 2011-01-23_15-02-31_421.jpg 2011-01-23_15-07-43_881.jpg install.mp4]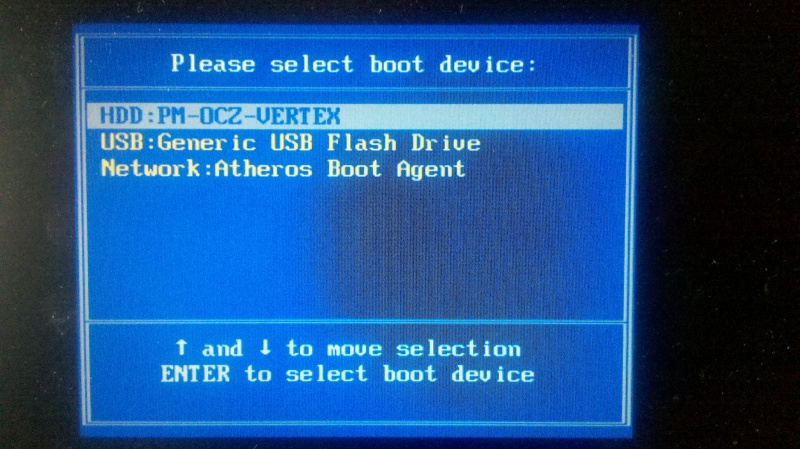 Select the USB stick to boot from. You should end up with a screen like this: [2011-01-23_13-22-52_42.jpg 2011-01-23_13-28-17_156.jpg 2011-01-23_13-48-33_687.jpg 2011-01-23_13-49-01_148.jpg 2011-01-23_13-49-14_588.jpg 2011-01-23_14-16-16_874.jpg 2011-01-23_15-01-03_124.jpg 2011-01-23_15-01-11_252.jpg 2011-01-23_15-01-34_812.jpg 2011-01-23_15-02-02_554.jpg 2011-01-23_15-02-31_421.jpg 2011-01-23_15-07-43_881.jpg install.mp4]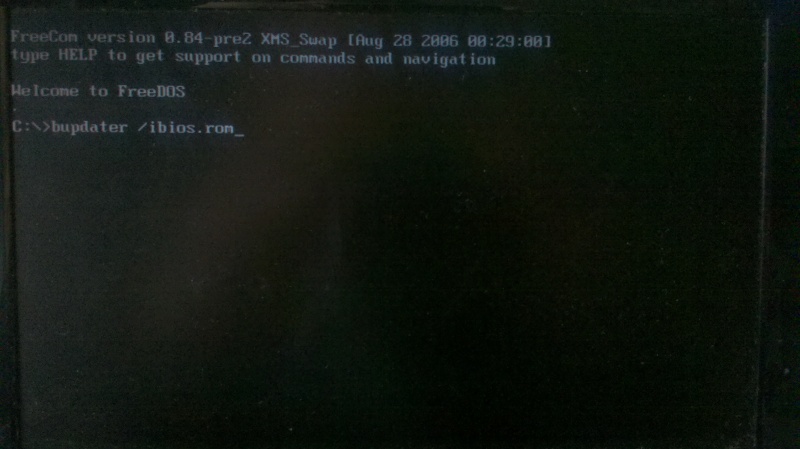 The command to flash is already shown. I didn’t bother to make a backup but if you want to do so, use the software to make a backup. After pressing enter the flash software will check the supplied image. [2011-01-23_13-22-52_42.jpg 2011-01-23_13-28-17_156.jpg 2011-01-23_13-48-33_687.jpg 2011-01-23_13-49-01_148.jpg 2011-01-23_13-49-14_588.jpg 2011-01-23_14-16-16_874.jpg 2011-01-23_15-01-03_124.jpg 2011-01-23_15-01-11_252.jpg 2011-01-23_15-01-34_812.jpg 2011-01-23_15-02-02_554.jpg 2011-01-23_15-02-31_421.jpg 2011-01-23_15-07-43_881.jpg install.mp4]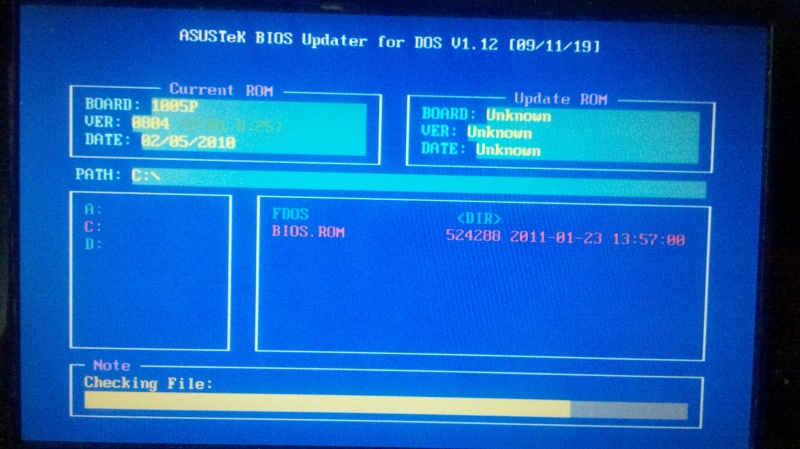 Then it will ask to confirm the flash action. [2011-01-23_13-22-52_42.jpg 2011-01-23_13-28-17_156.jpg 2011-01-23_13-48-33_687.jpg 2011-01-23_13-49-01_148.jpg 2011-01-23_13-49-14_588.jpg 2011-01-23_14-16-16_874.jpg 2011-01-23_15-01-03_124.jpg 2011-01-23_15-01-11_252.jpg 2011-01-23_15-01-34_812.jpg 2011-01-23_15-02-02_554.jpg 2011-01-23_15-02-31_421.jpg 2011-01-23_15-07-43_881.jpg install.mp4]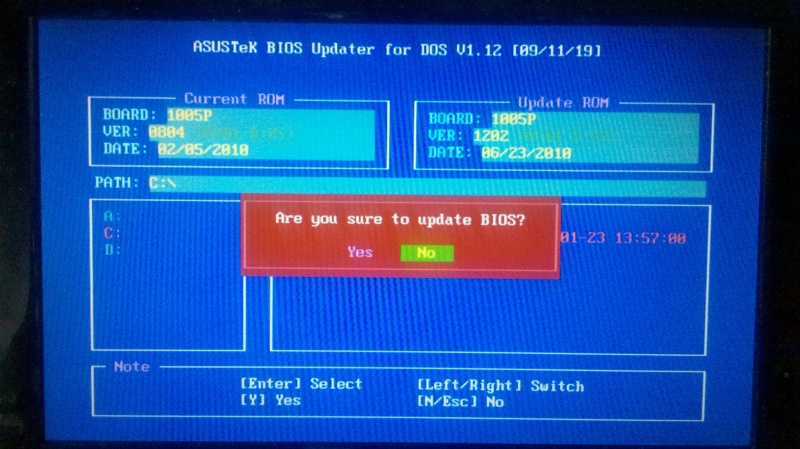 It will then flash the new BIOS. [2011-01-23_13-22-52_42.jpg 2011-01-23_13-28-17_156.jpg 2011-01-23_13-48-33_687.jpg 2011-01-23_13-49-01_148.jpg 2011-01-23_13-49-14_588.jpg 2011-01-23_14-16-16_874.jpg 2011-01-23_15-01-03_124.jpg 2011-01-23_15-01-11_252.jpg 2011-01-23_15-01-34_812.jpg 2011-01-23_15-02-02_554.jpg 2011-01-23_15-02-31_421.jpg 2011-01-23_15-07-43_881.jpg install.mp4]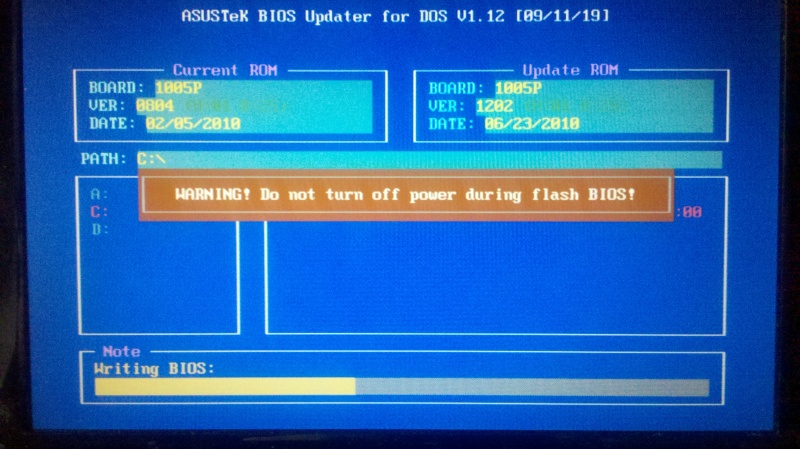 When finished it will prompt for a reboot. [2011-01-23_13-22-52_42.jpg 2011-01-23_13-28-17_156.jpg 2011-01-23_13-48-33_687.jpg 2011-01-23_13-49-01_148.jpg 2011-01-23_13-49-14_588.jpg 2011-01-23_14-16-16_874.jpg 2011-01-23_15-01-03_124.jpg 2011-01-23_15-01-11_252.jpg 2011-01-23_15-01-34_812.jpg 2011-01-23_15-02-02_554.jpg 2011-01-23_15-02-31_421.jpg 2011-01-23_15-07-43_881.jpg install.mp4] After rebooting, go into the BIOS (mine went back to default settings), check the version number and set all your customisations. [2011-01-23_13-22-52_42.jpg 2011-01-23_13-28-17_156.jpg 2011-01-23_13-48-33_687.jpg 2011-01-23_13-49-01_148.jpg 2011-01-23_13-49-14_588.jpg 2011-01-23_14-16-16_874.jpg 2011-01-23_15-01-03_124.jpg 2011-01-23_15-01-11_252.jpg 2011-01-23_15-01-34_812.jpg 2011-01-23_15-02-02_554.jpg 2011-01-23_15-02-31_421.jpg 2011-01-23_15-07-43_881.jpg install.mp4] |